Switch pakkages / SWAP

Love the idea of putting a smile on someone’s face just because you can 😊 Jools xx

SaSiBeau

Hello,

I have joined a group on FB where you make something for someone else and you get from someone else something in return.

Hallo,

Ik zit op FB in een groepje waar er geswapt wordt, dit betekend dat je een cadeau maakt voor iemand anders en jij krijgt ook een cadeau van iemand anders.

View original post 485 more words

Make It! Challenge #10: Crochet Island Play Set

Squirrel Picnic

Island Play Set with Animals Crochet Pattern by Squirrel PicnicLast spring, Brittani from Wisconsin challenged me to make her son a play set. Specifically, he really wanted a farm play set. Through my research, I found a few barnyard play sets already in existence, including this free one from Lion Brand (you have to log in to view the free pattern). I really loved the play set idea, so Brittani and her son agreed to let me come up with a unique alternative.

I was surprised to find there are a lot of crochet play set patterns out there. In addition to the farm one, I found a safari play set, a teddy bear picnic, a flower pot play set, a racetrack, and lots and lots of toy food. No one had made an ocean play set though, and I instantly fell in love with the idea of crocheting an island surrounded by little ocean animals. Thankfully…

View original post 3,061 more words

Greengate Style Baby & Toddler Girls Crochet Poncho

Oh wow! This is super cute! I know a little girl who would LOVE one!!

Sewchet

Hello Fellow Crocheters – this one is for you!

I’ve just finished a crocheted poncho/cape for a little girl’s Christmas present and I thought I’d share it with you. It’s entirely my own original design and, as I attempted to make notes as I went, it took a little longer than it should have. I reckon you could whip one up in just a couple of evenings which is great news for those of us who get bored easily.

Greengate Girls Crochet Poncho

Based on the lovely Greengate colours, I have a huge WIP that is of the same ilk;

IMG_0898

It’s quite simple really, just double and treble crochet with a picot edging, but the colours are so cheerful and bright.Greengate Girls Poncho4

Greengate Girls Poncho3

Greengate Girls Poncho2

This is my first attempt at writing a pattern so I hope you can work it out. The more experienced amongst you will probably be able to figure it out without referring to…

View original post 79 more words

My bag effort…..rather pleased with my 1st try!!

Happy weekend lovely people!

We live on a hill – think Peppa Pig world – which has its own atmosphere and weather system, so today, up on the hill it’s gloomy, dewey and grey, down the hill it’s clear and fairly warm, indeed ; the perfect conditions for my 8 year old, O, to score a goal with his football team, contributing towards the 13/0 score!!

So a happy start to the day!!

Since our return home I’ve been catching up on the X factor whilst adding finishing details to my ‘Welcome Panel’…….which I’m sooooooo close to showing you! I may even finish later tonight! More details to follow 😉

So today I’m going to share the messenger bag I made! I have a thing for bags, you know, as some women do, but they must be Cath Kidston bags!

Love love LOVE!!

But….also have some ideas of my own to ‘tweak’ their designs. For example, I have inserted zips onto two of my Cath messenger bags as the magnetic clasp just wasn’t enough for me and my ‘everyone is trying to steal my things’ brain. So now I use them and love them just a little more. So I had no plans to make similar bags.

Until……I fell in LoVe with some fabric at Kathys Patch, my local patchwork,fabric & sewing course shop. (It’s divine!)

So I got the fabric, some pink spotty lining fabric and all the various notions I needed to make a messenger bag! And with a clear 5 hours of child free time – whoop whoop!- I set about designing and making my bag. I had no idea if I would end up with something beautiful or dodgy, but I decided to persevere and give it a good go.

And after watching a YouTube video on inserting zips to end up with a pocket in the outer fabric, a French seam to hide the edges and a couple of zips from my stash with – rather luckily, I have to say – fit like a glove. I also made the pockets taller and sewed a wee pocket for my new iPhone 6 ( what a lucky girl I am).

Happy happy Jools!!

Have a look, I’m using it whenever I go out at the moment 😊

IMG_0009.jpg

IMG_0008.jpg

Plus, because I’m feeling excited about forthcoming projects, have a wee glimpse of my white on white, freehand machine embroidery, quilt as you go quilt…..

IMG_0010.jpg

Please let me know what you think, I love your comments 😊

Jools xxxx

Personalised papercuts

Yes, another raft I’ve fallen totally in love with!!

My lovely mum in law asked me to make a Christening present for her great nephew…..5 days before it was needed 😉

So a quilt was out of the question (remember I have 3 autistic children to look after!) and I needed something I could do quickly, but well, and preferably personalised.

So after some fun looking on Pinterest and Google, I designed a ‘Freddy’ papercut, with a gentle religious theme as the Christening was in a church. I’m really pleased with how it came out, and I even had a thank you note from Freddys mummy, saying she loved it!

Job done!

Have a peek and let me know what you think 😊

IMG_0006.jpg

Also……I cheated on this one, as it was a year and a half ago and I wasn’t quite as confident in my papercutting abilities. I don’t know who to thank as this was a random picture I found, but it was just perfect for my mummy, so I made it.

There, I said it, I blatantly copied ‘borrowed’ the design.

But it is sooooo lovely!!

But if I could thank the talented person that designed it, I would. Obviously now, a wee bit of time on, I have a look on the good old web for some inspiration, but try not to spend too much time researching, and more time playing with designs and making my OWN lovely things ☺️

It’s still lovely xx

IMG_0007.jpg

Super dooper large charm bag

Hallo all!

Having had a rather lovely summer holiday with 3 of my children – the eldest is grown up and lives a few miles away – I was also rather happy to have all 3 deposited safely at school for 6 hours!! Craft time!!

I’m a bit behind but will try to get you up to date ASAP. The first thing I’m showing you is……a huge bag made from a gorgeous Moda charm pack I got from ‘The Sewing Shop’ in Canterbury. I’d been sneaking looks at it waiting for inspiration to strike, and I LOVED the bright colours and patterns, and thought ‘oohhhh…..a big bag!’

So basically I laid out the squares, popped some thicker fabric from Ikea at the sides and bottom, and some pelmet vilene on the base.

I added wadding between the outer layer and the lining, then I freehand machine quilted a star pattern over the sides – a technique I LOVE!!! It adds a lovely touch to the gorgeous fabric.

Now you know I’m not really one for patterns per se, so I am pleased I ended up with a lovely strong bag that actually fits my daughter in. Seriously.

Also ( and this is where I’m a lucky bunny with my ‘no pattern’ crafting) it fits my sewing box in beautifully ! And some rulers, fabric, drawing pad, folder….you get the idea…..

Have a look, I hope you like it!

Nb I have improved greatly in the couple of years I’ve focused on my crafting, which I’m super proud of, but I still managed to sew the inside pocket on upside down. Oops 😉

IMG_2728.PNG

IMG_2729.PNG

Ooh what a flirty twirly patchwork skirt!!

I know I am going to be buying patterns for every 5lb I lose (as of today I’ve lost 12.3, yay!) but I have just finished something a lIttle special.

I saw a lady on tv with a patchwork skirt and thought ‘oooh I want one of those!’ So I decised to make one, of course!

I borrowed the accuquilt go machine from my quilting group and set about finding lots of fabrics to cut up! I did about 80 squares in the end, from all my favourite fabrics – even the one I just like to look at lol!

Having cut the 6″ squares, I laid them out in the lines I needed to make the skirt twirly, and had fun making sure each line matched and looked ‘just right’ (very important that it looks and feels right when you have OCD lol).

I sewers at he strips together – the strips for the front and the strips for the back were not joined together as I was told this would allow me more control when gathering the skirt, which was correct!

Once it was gathered and sewn into the front piece, I started on the back pieces, but not before me and the family had messed around with the half a skirt, using it as a caPe/shawl/semi-skirt…….

I used elastic at the top but realised -after little J had pulled it down ☺️-that I need stronger elastic……..

So here it is!

20140715-085050-31850376.jpg

I’m super dooper pleased with it!

Ps. If there are any mistakes it’s because hands are being incredibly naughty this morning having their spasms and tapping all the keys on my ipad lol…….

My first silver art clay charms!

I have been wanting to try using silver art clay for a quite a while now, but I was put off by the fact that the lady who did J’s fingerprint charm said there were loads of steps to it, it was really time consuming and difficult……

However, on a rest day a few weeks ago I watched lots of tutorials on YouTube and thought to myself ‘it doesn’t look that hard or complicated….. So I did lots of looking at kits and found one that came with 7g of SAC, but they gave me a 10% off voucher so I got another 20g, in two 10g packets as I read it dried out really quickly.

And STILL I waited a few weeks, scared of how difficult it could be.

And then we tried it – and it’s great fun and pretty easy, you just have to keep the clay ‘wet’ enough.

I made two heart charms, with fingerprints from my little 3 year old chap J, and my 6 year old girl K, then I used a star stamp on J’s and a butterfly stamp on k’s. Unfortunately, I tried to work K’s when it was a tiny bit damp so it broke, but I used another piece of SAC to bind the two pieces back together and will see if that works out lol!

The charm with J’ fingerprint on got placed on the camping gas stove, and I miss-judged the signs I was looking for to see that it was ready and consequently left the charm on there for 40 minutes…….when Mr C helped me we realised they turned very quickly! But I’m hoping the extra long treatment will mean the charm is superstrong!!

So here they are in all their glory:

Little J’s fingerprint and star stamp:

20140707-085641-32201104.jpg

Mr C’s tiny wee star charm:

20140707-085744-32264577.jpg

Do you like them?!

I’m really pleased to point out that the charm used about 2g of SAC, meaning it cost approx £4.

Yes, £4, not the £30 ish I paid for a charm of the same size! How fab is that! We have lots more ideas in the pipeline so keep an eye out for what is next 😀

Happy Crafting!

Jools xxx

Lots and lots of patterns for me!!

I know this is mainly a blog about crafts, but some of my personal life is going to seep through the edges!

So today I’m sharing my newest exciting craft incentive….

Since I’ve made a few small items of clothing for the kids now (shorts, skirts and dresses) I am rather desperate to make something for myself. However, being totally honest – as I always will be – I am a bit fat at the moment 😬

seriously, I am.

My weight fluctuates a lot as I eat when I’m happy/sad/depressed/bored/tired….you get the idea 😉 but having to have a test for diabetes (negative, phew!) and finding out my cholesterol was pretty high at over 5, I’ve decided (after another few months of eating more rubbish, unfortunately) to grow up and do something about my weight, especially as weighing less impacts on my pain, as I Have less body to drag around. My mental health is better too as. Don’t look at myself and and hate the way I look. It’s a win/win situation really!!

I have 50lb to lose!!

So, I’ve decided that as an incentive I’m going to buy myself a dressmaking pattern for every 5lb I lose!

I have already lost 10lb, and I got a dress pattern from a magazine and IM going to find a pattern for a lovely drapey blouse, to be done in liberty cotton lawn or a silky fabric.

What a great incentive lol!!

Happy crafting xxx

A rather surprisingly large floor pouffé!!

I’m a sucker for magazines…..I’m not even going to admit how many I buy a week, or month! So with trying to reduce outgoings/trips to WHSmith & sainsburys, I have been subscribing to the ones I particularly love, as soon as an offer I love comes about – good plan, don’t you think? Especially as the subscription payments comes from the joint account instead of my personal account…..it really does save me money 😉

One such gift I received was a Moda Jelly Roll. Now I have to say, for quite a while I didn’t see why all the fuss was about some strips of fabric, until I saw one unravelled and it was like a rainbow coming to life! Ever since then, I’ve loved them!

So a had a spare one, as such.

And one morning, when I was watching Create and Craft playing with the kids, they had a plastic template on that caught my eye. However, it was floppy plastic, and it occurred to me that however magnificent my cutting skills are (n’t) you could easily trim away the minutest part, thus rendering the template defunked. So I set about finding a different template on Mr Google.

After 2 hours, and lots of sweets/fizzy drink/tv given to kids, I came across the ideal perfect solution to my template woes.

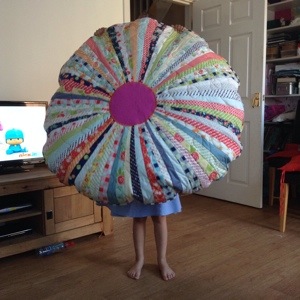
So here it is: Moda Jelly Roll Floor Cushion

PLEASE take a second to look, it’s fabulous! You basically cut all your Jelly Roll strips in half lengthwise, then cut them again at a rather special diagonal, which leaves you with a set of larger and smaller triangles.

You simply cut and sew!! Amazing!! And what I really, really like is that there is no waste. All the other templates/patterns I found wated loads of fabric, but with this recipe you make 2 floor cushions and have absolutely no waste – what a result!

So here it is in all it’s splendor……

20140628-201739-73059065.jpg

Lovely, isn’t it?!

Bet you didn’t think it was so big though……

20140628-201846-73126311.jpg

Yes there is a small K behind it!

I fused the circle to the middle to hide the big mess that was underneath, then set my zig zag stitch big & tight, and appliquéd the circle to the strips. I made piping (a first for me!) then cut a backing from a gorgeous remnant I had….then put 3….yes, three bags of stuffing in! Sentimental thing that I am I got my 6 person family to pop a wee bit of stuffing in each ☺️💗

And it’s done! And enjoyed by human and dog alike xxx

20140628-202227-73347752.jpg

20140628-202230-73350185.jpg

20140628-202229-73349589.jpg

20140628-202228-73348246.jpg

20140628-202228-73348723.jpg

Now to make the smaller one…..😉

With smiles and love, Jools xxx